Archive for the Unity Category

Young Game Designer’s Week – Summer School

Posted in Unity with tags , , , on 2012/08/06 by duck

This morning saw the start of Young Game Designers Summer School at South Hill Park’s UK Digital Media Centre.

I’m leading this week-long course as we see whether ten teenagers (14-18 years) can learn Unity and make a game in a week, as well as picking up some game design theory and techniques along the way.

I’ll be live-blogging/tweeting as we go and encouraging the students to do the same, so watch this space for updates through the week, or follow me on twitter!

Code Optimization in Unity : Part 1

Posted in Unity on 2011/07/26 by duck

“Code Optimization” : the pursuit of modifying code to work more efficiently.

Optimizing code in general can be a controversial subject, and upon wading into the topic even ankle-deep, you are bound to encounter the well-known quote, “Premature optimization is the root of all evil”.

It’s from a 1974 paper by Donald Knuth, in which he warns programmers against wasting “…enormous amounts of time thinking about, or worrying about, the speed of noncritical parts of their programs”. *

This is good advice, and experienced programmers understand it. However the advice is more problematic if you don’t have so much experience in programming, because your ability to even estimate which parts of your project might be “non-critical” are not yet well developed. This makes the advice rather unhelpful to those who perhaps need it most. So, this article is an attempt to shed some light on the subject, as well as being an introduction to some of my optimization tests that I have been putting together.

The specific goals of optimization in Unity tend to revolve around making your game run faster so that it plays at an acceptable rate. There are occasionally other goals, such as reducing memory usage, or even drawing less battery power, but as a starting point I will be focusing on optimizing for speed.

For a game to run at an acceptable speed, it needs to reach a certain acceptable number of “Frames Per Second”. Each frame, your game has to execute all the relevant code, calculate physics, play sounds, and display the graphics in their current state. Each of those tasks takes a certain amount of time to complete, and to achieve a speed of (say) 30 frames per second, the computer must calculate everything it needs to display the next frame of your game in one-thirtieth of a second. The relative time taken for each task can be thought of as its “cost”, and the total time available to you each frame, can be thought of as your “budget”.

Understanding and identifying the relative sizes of the costs in your project is a crucial first step. Without doing this, you are essentially working blind. Imagine trying to make a car go faster by adjusting the angle of its aerofoil, without noticing that there is a trailer full of rubble attached to the back. Or trying to balance your monthly food budget by selecting between the two cheapest brand of tea-bags, while at the same time forgetting to cancel your weekly delivery of caviare. The differences in scale within the operations in your game can be even larger than these examples.

I regularly see questions in Unity forums and chat rooms which ask about whether a certain function is faster than some other function, or whether one kind of loop or data structure is faster than another. These kind of comparisons are sometimes valid, and there is a place for looking for optimizations at that level of detail – however it’s vastly more important to first be able to understand whether these things are relevant at all in the overall view of what is taking up time within your game each frame.

The first thing you should know is that unless you’re doing something very unusual, your code is probably not taking up a large portion of that time. Back in 1974, and indeed in many modern day programs in the wider area of computer science, your own code would be the first place to look to speed things up, however things are very different when you’re working within a high-level games-focused environment like the Unity engine. For a typical Unity game – particularly a desktop or web game, there is usually an awful lot going on that isn’t connected to the speed of your own code at all. The rendering of the graphics and the physics engine calculations are likely to be taking up the majority of the time it takes for you game to complete a whole single “frame”.

I can give you a couple of examples using the profiler which comes with the Pro version of Unity:
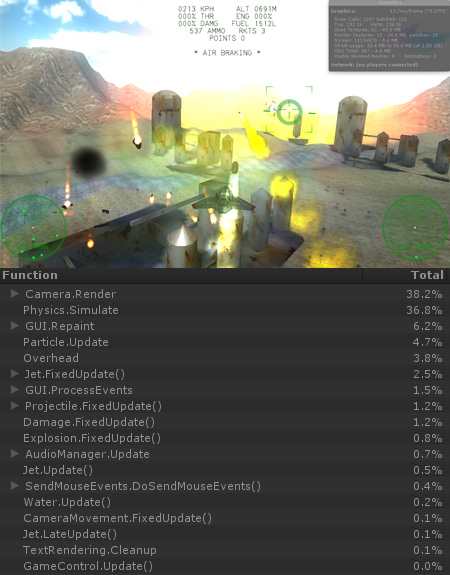
The above game is a kind of aerial combat game. Listed under the screenshot is the output from Unity’s profiler, showing the relative time taken for each of the listed functions running in the game. You can see the camera render function at the top of the list, taking 38% of the frame time. Next is physics engine taking up a similar sized portion of time – there are lots of objects flying around, mostly debris in the above pic. After that comes the GUI rendering (which is drawing the radars, target sight and the on-screen text), then Particle system code (unity’s built in code, not code I wrote), then “Overhead” which is pretty vague but I guess it’s just some underlying cost of Unity doing its stuff.

Finally we reach the first item in the list which contains any code at all that I wrote myself. The Jet’s FixedUpdate function, weighing in at 2.5% of the frame time.

This is the main script for the player’s jet in the game, but also this script is on about 6 other enemy jets in the game too, and even has the AI code in there. So that single entry is actually running all 7 jets in the game.

This isn’t a tiny script – the FixedUpdate function is about 500 lines long, dealing with applying forces to the jet object, targetting, firing, ammo, and also contains the AI code for the enemy jets!

Here’s another example:
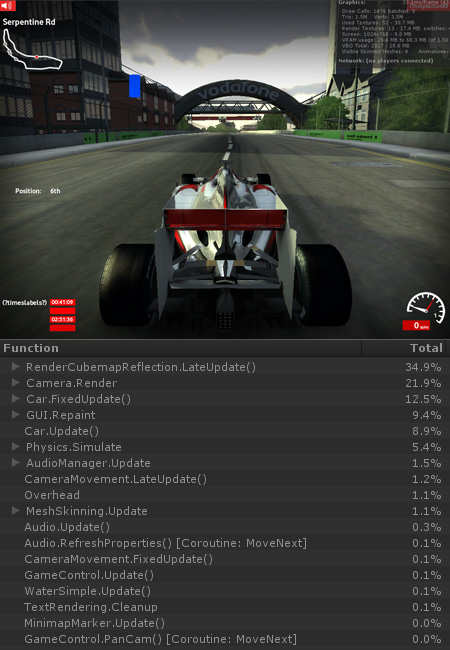
At the top, you can see the RenderCubeMapReflection class is taking up a whopping 35% of the total frame time in the above game. Below that is the main camera’s rendering function, at 22%. TheRenderCubeMapReflection class is responsible for building a cubemap texture from 6 camera angles from the car’s position, which is then used as the reflection of the car in the game. The camera’s Render function then renders the single view from behind the car that we see in the screenshot.

If we also add on GUI.Repaint (which is used to draw the GUI), this comes to about 67% of the frame time just used for rendering graphics in this game. The physics comes in much lower in this game, because there is basically only a single moving object in the game. The two most expensive script functions – which are basically responsible for pretty much all the gameplay (Car.FixedUpdate at 12.5% and Car.Update at 8.9%) come to just over 20% combined.

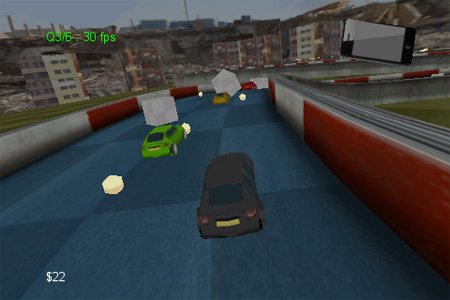
And here’s an example of a simple racing game running on the iPhone (a 3GS model), using Unity’s iOS profiler output:
iPhone Unity internal profiler stats:
cpu-player> min: 13.8   max: 32.4   avg: 20.1
frametime> min: 28.2   max: 52.1   avg: 34.9
draw-call #> min:  13    max:  17    avg:  14 | batched:    80
tris #> min:  5096  max:  6932  avg:  6100 | batched:  5358
verts #> min:  4052  max:  5798  avg:  4950 | batched:  2920
player-detail>
physx:  8.4
batching:  1.2
render:  4.5
mono-scripts> update:  2.3   fixedUpdate:  3.2 coroutines:  0.0

This is an unreleased prototype car racing game with 3 AI opponents, collectible items and physics objects strewn around the track. The profiler output is different, and most of the numbers (except those marked with #) are measured in milliseconds. I’ve cut out a few of the less relevant things, plus the items which came in at zero (such as skinned mesh animation – since this game doesn’t use it). My average frame time is 34.9ms (which works out at roughly 30fps), and of that time, my scripts (update & fixedUpdate) take up about 15% of the total frame time, physics take 24%, and rendering takes about 12%. I’m assuming the remaining time is simply the overhead of the unity engine running on the iPhone.

So again we can see that although the time taken to execute my code does have some significance, it’s certainly not the dominant factor in determining how fast the game runs. I think from these three examples, the take-away message should be:

Make sure you know whether you need to optimize your code at all.

Compared to everything else going on in your game, it’s entirely possible that all of your code falls into the “non-critical” part that Knuth was referring to. If the first two games above were running slowly, and they needed to be optimized, it would not be sensible to start optimizing the code first, or perhaps even at all in the case of the jet game. There are clearly other things which are massively more important in terms of framerate – the number of particles, the draw distance, the number of draw calls, the image effects (particularly the car’s reflection!), the number and complexity of physics objects, etc.

As for the iPhone game above, there may be a case for optimizing the code, but only once the physics have been double checked to be as simple and efficient as they can possibly be – since they consume the most time per frame.

Now, somewhat ironically, I started writing this article as an introduction to the low-level optimization tests I have been putting together which test the relative speeds of various common structures and techniques used in unity game programming. However this whole thing may have accidentally ended up sounding more like a warning to avoid code optimization altogether! This is not what I’m saying, because code optimization does have its place – particularly when targeting iOS or Android devices. It’s just important to make sure that you have a good overview of where the processing time is really being spent in your game before diving into the code to try to make it faster, and I guess this article will act as a primer for that.

In my next post on the subject, I will be getting down to the nitty-gritty of code optimization in Unity,  including the results of my performance tests, and some examples of how you can measure the speed of your code yourself, even if you don’t have access to Unity Pro’s profiler – so stay tuned!

Damage Control

Posted in Games, Unity on 2011/02/03 by duck

Hello all,

Just posting to announce a new game that I recently finished working on at Skive. It’s another Unity 3D game, called “Damage Control“. ,It’s a much smaller production than our previous Unity game, but hopefully offers some bite-sized lunchbreak-style fun!

It’s an unusual action puzzle game in which you control a demolition wrecking ball with your mouse. You can swing the ball at the building to demolish any part you choose, however behind the front facade of the building are different coloured layers of brick.

The goal of the game is to match a “target pattern” (shown top-left) within a time-limit by knocking chunks out of the building front to reveal different coloured layers beneath.

Anyway, this video probably gives a better idea than my rambling!

The game was produced in a particularly short time-frame (25 days), and uses a Flash front-end for the interface, instructions and level-select screens.

You can play it at:

http://kitkat.co.uk/Flash/#/need-a-break/games/damage-control

And you can read more about how this Unity game tied in with the KitKat site here:

http://blog.skive.co.uk/index.php/2010/08/24/kit-kat-music-brands-biggest-ever-digital-spend/

Hometown GP : Launched!

Posted in Games, Unity on 2010/09/11 by duck

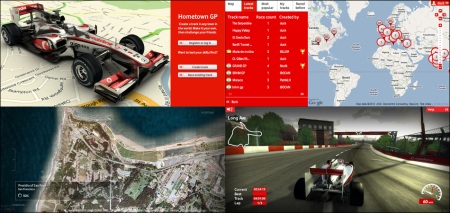
I’m really pleased to announce that our new game, “Hometown GP“, has been launched!

Hometown GP Screenshots

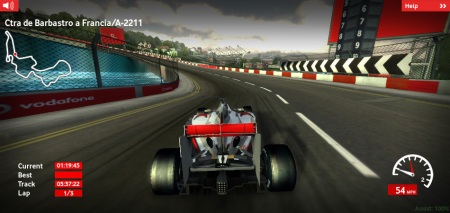
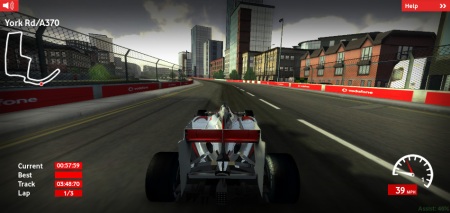
This is the latest browser based racing game from us at Skive, this one being a Formula 1 racer with a unique feature: By using a custom Google Maps interface, you can create your own tracks on real roads – pretty much anywhere in the world – and the game will dynamically generate a 3D racetrack which matches your route.

The idea is to be able to experience Formula 1 coming to your home town – so you could create a route which goes along your street, past your local shops or school, etc. Of course you can also choose to build anywhere else in the world too, if you feel like exploring! Combining Flash and Unity 3D technologies with route, altitude and satellite data from Google maps, this project breaks new ground when it comes to technology “Mash-Ups”.

If you’re logged in and finish 3 laps of your new track, it gets saved to the database and will show up as a marker pin along with everyone else’s tracks around the map of the world. You can share your tracks via facebook and twitter, and challenge your friends to beat your times on any course.

Here’s a video of the game in action:

Notable features:

  • Intuitive custom track designer built on Google’s route finding technology.
  • Dynamic 3D world created to match your design.
  • Analysis of real satellite & terrain data used to decide placement of trees, buildings and open space.
  • Real altitude data used to create track height and surrounding hills.
  • Realistic scales and Formula 1 speeds.
  • Dynamic driving assistance adapts to your performance – casual gamers and skilled drivers alike should find the game equally enjoyable without the need to fiddle with menus and settings.
  • Community features allow you to race other people’s tracks, and share your tracks with others.
  • Adaptive quality degradation ensures very high visual quality on high-spec machines, while low-spec machines prioritise framerate – without the need for manual settings.

You can play the the game here:

http://racing.vodafone.com/hometown

However you might also like to try some of these direct links to tracks which I think show off the game quite well:
(try and beat my times on these!)

And finally, some stills – for those of you who like that kind of thing!

Hometown GP Screenshot

Hometown GP Screenshot

Hometown GP Screenshot

Hometown GP Screenshot

Hometown GP Screenshot

Hometown GP Screenshot

Hometown GP Screenshot

Hometown GP Screenshot

Hometown GP Screenshot

Quick Tip : How to choose which way to turn?

Posted in Code and Scripting, Quick Tips, Unity on 2010/09/07 by duck

Often situations arise in game coding – particularly in AI – where you need to be able to calculate which way to turn in order to reach a certain angle.

Certain types of motion in Unity allow you to avoid this question altogether, such as Slerping (a.k.a. using spherical interpolation) from one rotation to another. Sometimes you need to be more explicit in your code however, and in these cases you often need to deal with and make decisions based on the angles themselves.

Some situations involve completely free-moving objects that need to turn in any direction, such as a spaceship that can fly in any direction in 3d space. Other times, you have more constrained situations (eg, a boat, car, or any other object which is turning but constrained to some kind of surface) where you simply want to decide between a clockwise or anticlockwise direction when turning.

This tip tackles the latter of the two, where you need to make a decision about turning clockwise or anticlockwise based on arbitrary rotations or directions as input.

An example of this would be an AI controlled car, which might need to turn towards a target (another car, or the next waypoint, for example). You don’t want to use interpolation, because that would preclude realistic car physics. You wouldn’t want it making a 270 degree turn to reach a target that was 90 degrees to the left, but how to determine which way to turn?

These situations usually boil down to one of the following cases, where you need to find:

  1. the angle between two rotations,
  2. the angle between a rotation and a target position,
  3. the angle between a rotation and a target direction, or
  4. the angle between two direction vectors

The key to solving anyof the above lies in the fact that whichever case you have, you can convert it to the last case – where you simply have two directional vectors to compare – and from there you can use a few simple math functions to return the angle you want. Unity provides some very useful functions in its API which help along the way.

Starting at case 1, you have two rotations (which in Unity are represented by Quaternions).

A rotation can be converted to a directional vector by multiplying the quaternion by the world-relative “forward” direction. Forward in Unity is represented by the positive direction along the Z axis (i.e. 0,0,1) and there is a handy alias to this value on the Vector3 class called “.forward“, so assuming “rotationA” and “rotationB” are our quaternions, we can get our two directional vectors like this:

// convert both rotations to direction vectors:
var forwardA = rotationA * Vector3.forward;
var forwardB = rotationB * Vector3.forward;

It’s also worth noting that in most cases in Unity, when you’re dealing with a rotation, it is very likely to have come from a GameObject with a transform. If this is the case, there’s an easier method of getting the forward vector, which is to use the built-in variable: transform.forward which directly gives you an object’s forward direction as a vector:

var forwardA = objectA.transform.forward;
var forwardB = objectB.transform.forward;

Now looking at case 2, where we have a rotation and a target position. Assuming we’re working with gameobjects, we can use the transform.forward of our object that is trying to turn towards the target (eg, the car) for the forward direction, and if this script is placed on the car itself, it’s as simple as this:

var forwardA = transform.forward;

To get the direction vector towards the target (case 3), we just need to subtract the target’s position from the car’s position, like this:

var forwardB = target.position - transform.position;

You should now have two directional vectors whose angles you want to compare to each other.

The final part of the puzzle lies in the fact that you want a signed angle (i.e. either a positive or negative angle). That is, you want to know more than just the numeric difference in angles, you want to know whether to turn clockwise or anticlockwise to get there. To get a signed angle doesn’t really make a lot of sense in 3D space, because the direction of rotation from one direction to another could be in any 3d direction (not just in one of two ‘flat’ clockwise/anticlockwise directions).

For this reason, it usually makes sense to compare your vectors on a certain chosen 2D plane, and ignore the 3rd axis. For example, in the case of cars you’d probably want to compare the “Top Down” directions as if on a map, ignoring the inclines of hills. This would be the X-Z plane in Unity.

To convert these vector directions to numeric angles in this way, you can use the Atan2 function, like this:

// get a numeric angle for each vector, on the X-Z plane (relative to world forward)
var angleA = Mathf.Atan2(forwardA.x, forwardA.z);
var angleB = Mathf.Atan2(forwardB.x, forwardB.z);

However, this function returns its result in radians, which is just a different scale for measuring angles, and can be converted back to degrees very simply by multiplying the result by a built-in value called Rad2Deg in Unity which is provided for just this purpose, so to have the result in degrees, the above lines would end up looking like this:

// get a numeric angle for each vector, on the X-Z plane (relative to world forward)
var angleA = Mathf.Atan2(forwardA.x, forwardA.z) * Mathf.Rad2Deg;
var angleB = Mathf.Atan2(forwardB.x, forwardB.z) * Mathf.Rad2Deg;

And finally, Unity provides a simple function for getting the signed difference between two numeric angles in degrees (which is what we’ve been working towards!) called DeltaAngle, which you would use like this:

// get the signed difference in these angles
var angleDiff = Mathf.DeltaAngle( angleA, angleB );

You now have a single numeric value which should be in the range of -180 to 180. Negative values indicates your object should turn to its left, and positive, to its right.

Hope this comes in handy out there in Unityland!

Yard Invaders 2 : experimental prototype

Posted in Games, Unity on 2010/09/02 by duck

Well, my “Procedural Racer” game has been taxiing for launch for quite a while now – as soon as it’s ready I will be posting here. In the meantime, here’s a video of an experimental gameplay prototype I put together, as a possible sequel to one of my very old 2D shockwave games called “Yard Invaders”.

I tried out a number of new things while putting this together, including:

  • Procedurally generated spherical terrain
  • Spherical gravity
  • Custom grass shader
  • Depth of field effects
  • Explosion effects (not detonator)
  • Intuitive auto-targeting of enemies

Whether this ever makes it to the status of a finished game remains subject to the mysterious tides of fate.

Racing Game Sneak Peek

Posted in Games, Unity on 2010/06/22 by duck

I’ve been very quiet over the last few months, because I’ve been working on our latest Unity game. It’s crunch time right now – the game is due to be released shortly – and I’m getting pretty excited about being able to show it off! I can’t give away too much yet, but I do have the all-clear to release a few development screen captures to whet your appetite!

What I can share:

– It’s a racing game
– It features very fast cars
– It has procedurally created tracks, meaning it has… INFINITE LEVELS!

Here’s some video. (The track building process has had gratuitous animation added for artistic effect):

And here are a few stills of the procedural system with some explanations:


First a track surface mesh is build based on a 3d spline curve


Detail objects are added along the roadside

Non-intersecting positions are calculated for larger scenery objects
Non-intersecting locations are calculated for larger roadside scenery


A heightmap is computed which fits the spline, and objects are automatically grounded to it

And here are a few in-game shots of some of the possible track layouts:

First a track surface mesh is build based on a 3d spline curve

Quick Tip : Unity Particle System Nebula

Posted in Quick Tips, Unity on 2010/01/27 by duck

Here’s a quick way to create a “nebula” effect without any code at all:

  • Create a default particle system from the menu in Unity’s UI
  • Delete just the “Particle Animator” component
  • Check the “One Shot” option in the emitter settings

Now you have a static set of particles. The min & max emission controls how many particles there are (you should probably set them both to the same value, unless you want a random value somewhere between the two). The default particle textures are already fairly suitable as they are have a fuzzy glow look. Try these values for a very quick nebula-like effect:

  • Min size: 0.1
  • Max size: 0.7
  • Min & Max emission : 200

You might want to set one of the ellipsoid size dimensions smaller than the others, to give it a sort of oval shape instead of spherical. And of course you could  use some custom particle textures, colour variations, and adjust the size to fit your game.

When I tried this, I found that having two particle systems in the same location worked really well, where the first particle system serves to show the larger blobby white areas, and the second particle system has the size values turned right down so that the particles are tiny specks, and the emission values turned right up (to 2000 or so).

Using two particle systems

The settings for the first particle system are:

  • Min Size: 0.3
  • Max Size: 3.5

And for the second particle system:

  • Min Size: 0.01
  • Max Size: 0.03

And apply these settings to both systems:

  • Emit: On
  • One Shot: On
  • Simulate in world space: off
  • Min Emission: 2000
  • Max Emission: 2000
  • Ellipsoid: X:8, Y:4, Z:8

Then add the second system as a child of the first system (by dragging the 2nd onto the 1st in the hierarchy). Because they are not set to simulate in world space, you can then just rotate the parent particle system and the whole nebula will rotate including the tiny dots in the child particle system.

(until I sort out proper hosting for my unity files on this blog, you’ll have to make do with pretty pictures and video!)

Duck’s Quick Tips : Intro

Posted in Quick Tips on 2010/01/22 by duck

While going about my daily business (mainly coding in Unity 3D), unless we’re going through some sort of crunch point at work, I often spend a little bit of time each day “sharpening my saw“. That is, doing something that’s not directly related to the current main job, but theoretically makes me better at doing my job.

Sometimes it’s looking into a section of the manual or API that I’m less familiar with. Sometimes it’s reading up on developments in the technologies that surround my field of work. Sometimes it’s helping out with a question or two on the Unity forums, or the IRC channel (which are both places that I go looking for help myself too, sometimes). This often results in “saw-sharpening” because my favourite type of questions are the ones where I sort of know the answer, but I have to quickly look up / test out that knowledge to confirm it. This has the effect of hardening what was vague knowledge of a particlar area into a small chunk of concrete experience, which effectively adds to the array of tools and know-how that I have at my disposal when approaching my own work.

In this new “Quick Tips” category, I’m going to be documenting these short & sweet nuggets of information. In effect, this is a kind of excuse to get a bit more content posted here in the tiny amounts of spare time that I have. They won’t be full tutorials, they might not be useful to everyone, and they will almost certainly vary wildly between beginner and advanced levels – but if you’re interested in the occasional sharpening of your Unity blade, please feel free to subscribe or follow!

Driving Fun in Unity with Augmented Reality

Posted in Augmented Reality, Unity on 2009/11/30 by duck

Over the past couple of months I’ve had the chance to get in a bit of Unity research and development time, and one of the areas I have looked at is Augmented Reality. By far the most entertaining experiment so far has been my “AR Driving” demo, which I tried out at the Skive London office recently. It could be said that this particular demo isn’t strictly AR (because it doesn’t overlay graphics on the video stream) but still, it uses AR technology to map the orientation of an AR marker to the steering, acceleration and braking of a car. I recently demoed it in our London office, result: Fun!

The control works by reading the orientation of a single AR marker printed on an A4 sheet. The sheet is folder so that the marker is visible to the camera on one side, and a steering wheel image is visible on the other side – so the user knows which way up to hold the paper!

The rotation around the Z axis (as in, turning the steering wheel) is mapped to the car steering, although not entirely linearly – in order to make the controls easy to use it required a few tweaks, such as smoothing out the sometimes jittery raw data, and giving bias to a ‘not-quite-dead zone’ around the zero-degrees rotation area to make it easier to drive the car in a straight line.

The acceleration and braking controls are implemented by reading the “tilt” of the marker around the X axis. Holding the marker straight-on to the camera gives the equivalent of a steady gentle press on the accelerator. Tilting the top edge towards the camera pushes down the accelerator, while tilting it away releases the accelerator completely and applies the brakes.

The final result is a fairly intuitive driving control, and most people who had a try in the office seemed to find the car responsive and easy to control on their first try, as the video shows!

At the present time (Unity 2.6), implementing AR isn’t entirely straightforward, not least because Unity doesn’t have any built-in way of reading video streams coming in from the webcam, so the webcam stream in this demo is being read via a custom DLL, and the AR markers are picked up from the video stream using the beta version of “UnityAR” (also a custom DLL, which provides an interface to ARToolkit) from Weltenbauer who have kindly made their beta version free. An alternative to this technique is to set up a socket connection from a flash movie, and send either the video data, or the AR marker data via the socket to Unity. Neither of these methods are particularly ideal!

To cut a long story short, because of these custom DLLs the demo is a Windows-only EXE at the moment, and can’t work as a webplayer at all. Now, if UT would add support for webcam input in Unity (in a similar manner to flash) it would open the doors for browser-based AR, which is something that Unity could really excel at.

Unity does have a User Feedback Forum, where you can vote up feature requests for future versions – so if you’re interested in this, vote up Webcam input!